 |
Call Of Duty 4 : Modern Warfare |
|

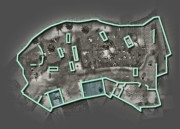
Bog is a multiplayer map of Call of Duty 4: Modern Warfare. It is based off of the singleplayer level of a similar name, The Bog. The map is a very wide open and set in a junk-filled Middle-Eastern field. There are four regions on the map. The first is the swampy northeastern section of the map. Although it appears to be wide open with little or no cover,the tank, the tall grasses, and the random bits of junk are surprisingly effective at concealing a soldier. The "Hamburger Hill" can be used to snipe towards the other side of the map. The next area is the middle building. It houses bomb plant point A in Search and Destroy. Anyone on the west side of this building has a good shot in, and claymores are very effective for preventing anyone from coming in. The third region is the corner building in the southwest corner of the map. It is the spawn area for defenders in Search and Destroy, and has excellent sight lines towards the east. The pile of small boxes on the northern edge of this building can be an excellent sniping spot. The final region is the western half of the open area. It features several large shipping crates and a bus for cover. A patient, unmoving sniper can be concealed surprisingly well in the back corner of this section. A good tactic is to plant claymores in the left building because there are stacks of people that rush the area.
| Team DeathmatchTeams will usually remain segregated to their own side unless they make a big effort and flank their opponent's side. Players often camp around popular cover spots and shoot back and forth at each other. This basically creates a "no man's land" around the bus, and often prevents either team from advancing to the other side. Free for AllGames here are very fast paced due to the near constant threat of enemies (although the map seems pretty big, there is almost always an enemy nearby). Because of this camping is also less of a problem. Despite this, sniping is still pretty effective for those who can "shoot and scoot" to a different location quickly. |
Sabotage
As in Team Deathmatches, a team must make a significant push to advance deep to the plant point. Speed is key here, and those who can get behind the enemy fast often get big kill streaks.
Headquarters
The map is decent for Headquarters. Although the shipping crate HQ can have very fun and intense firefights around it, the other HQ's spawn close to each team, leading to "Wet Work Syndrome" (in which one team spawns right on top of a HQ at one end of the map and the other team must hike all the way across to try and capture it).
Search and Destroy
The map itself is relatively well balanced for S&D. However, spawn sniping and "grenade mortaring" are very bad here (especially in hardcore mode). If the player survives the initial volley of sniper fire (which can be done by immediately going towards "A" for either team), one must be wary of enemies using the bus, shipping containers, and hill as cover.
Domination
Fighting is often fast paced and frantic as spawn points can become sandwiched between enemy spawn points.
Ground War
The map can support a large number of players well, but the large concentration of fire makes the map extremely dangerous to move around on.
Cage Match
The use of assault or sniper rifles works well on this map as the majority of the time one's opponent is at far distance. Staying on the outside borders of the map is a good idea.
- Use Deep Impact. An RPD w/Red Dot, Stopping Power and Deep Impact is the best way to eliminate snipers camping behind the various cover around the map. Deep Impact is particularly helpful for clearing out the bus, shooting snipers way across the map in the "market" area, eliminating players in the fenced area to the left of A, and through the walls right in front of A where many people will camp.
- Use smoke. Friendly snipers camping in the back might not appreciate it but smoke is really the only way to get across the map sometimes. Throw them as far as possible towards the other team once having spawned, it really truly helps.
- A simple but rarely used tactic is to enter the broken bus on the west side. This tactic is a great way to snipe some players on the enemies side of the map. Always stay alert if in the bus by crouching down and having a quick look outside the broken windows of the bus. It is very easy for enemies to eliminate the player if he/she is not paying attention. If the player can see enemy soldiers about to come on the bus, attempt to knife this enemy and leave the area. If the player uses this tactic, any bolt-action snipers are recommended. They are effective because most people would shoot an M21 or a Dragunov like a semi-automatic rifle, this will give the player's location away. Another tactic to use in order to stop enemies from entering the bus is to equip claymores on a sniper class. If one places a claymore near a corner of the bus, or in one of the doorways it will likely stop them from entering the bus and stopping one's killstreak.
- A good idea is to use a sniper rifle by the east side of the map, behind the walls. Aiming at the building entrance on the left side of the player's view (South on the map), where a lot of enemies go in and out and around, using an M21 is a good idea because the area is usually crowded. The M21 can quickly fire more bullets, unlike other sniper rifles.
- If the player spawns as the Marines, it is also good to snipe at the spawning point. As firefights usually take place in the buildings and in the middle of the map, however, if the player is OpFor it is good to snipe in the small market place near the spawning point as the crates make the player less visible. Be wary as it doesn't offer any protection as bullets will just pass through the crates, the player can then rush to the broken bus.
- Airstrikes will never hit enemies underneath the overpass so do not place airstrikes there. This can be annoying if the player wishes to provide cover for their team trying to plant the bomb (or defuse) on Sabotage.
- The shops near the south of the map (to the left of the Marine spawn) is the first place many players will go. The player should have teammates if going there, shotguns and SMG's are highly advised.
- In Domination, B flag is very herd to defend, and is usually the biggest area of fighting. If you are defending B, snipers are effective for their firepower, and machinegunners are effective for their large magazine count and ability to spray bullets thrugh large open areas, set both up in the bus, and behind the numerous dumpsters and cargo containers. If you are capturing B, using an RPG-7 and grenades are effective for clearing groups of the enemy and opening up an area for you to move in and take B.
Trivia
- As part of the walls around the arena of Bog, there is a fence through which one can see part of the mapCrossfire.
- There is a lot of ZPU anti-aircraft fire lighting up the sky, although no helicopters or planes are visible. Also, if the Cobra helicopter enters the stage when a Helicopter is called in, it will not target it.
- The tank in the center of the map appears to be a destroyed War Pig - it has the same markings.
- The majority of the large containers located throughout the map have the letters IWCOD and the numbers 1337.
- Interestingly, Lt. Vasquez's defense plans that he drew on the side of the M1 Abrams in the single player campaign level "The Bog" have disappeared.
- The OpFor have an unfair advantage in this map while prone, as they greatly blend in with the ground.
- Snipers usually prefer this as a good map to snipe.
- The ZPU fire comes from outside of the map and actually comes from walls, buildings, and the ground. Also, no turrets are seen firing.
- There is a destroyed T-72 outside the map in the streets. From the way the barrel is angled, it might have been the enemy to destroy War Pig