Call Of Duty : Modern Warfare 2 | 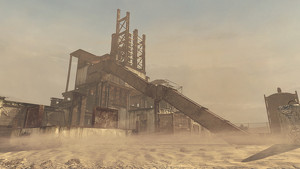 |
The battle is between Task Force 141 and Afghan OpFor. It is set in an oil yard in the middle of the desert. It is considerably larger than Shipment from Call of Duty 4. Featuring a tall tower surrounded by open space with some cover such as containers and some pipes. The central tower has a ladder and two connecting pipes to reach the top, allowing players to see the area below. There is another elevated area in the corner by accessing the round pipeline. Behind this building is a small tunnel, one of the few areas that provide good cover from air attacks. Furthermore, the area around the tower has two hidden "tunnels", one by the ladder, and the other on the other side. They are very dark and small, and can be used by stealthy players to ambush enemies.
Rust is the 'spiritual successor' to Call of Duty 4: Modern Warfare's Shipment. While the majority of Rust's layout is different, the two maps are both very small maps. This is also one of the more multiplayer-flexible maps. Only close range weapons will work here.
Due to the small size of the map, players will spawn within close proximity to each other. Occasionally, players will spawn directly in someone else's line of sight, resulting in very quick kills. There are very few viable camping spots as most locations are exposed or easily accessible. It is very rare now to have a match here and hard to build streaks.
This map is generally unpopular due to the amount of "spawn kills" and grenade spamming as well as a large amount of Grenade Launchers and Thumpers used, skilled and experienced players can often counter these methods. Although it is easy to get vast amounts of kills on this map it is still generally skipped for larger maps.
Sometimes the player can run into a team of pure "stabbers" which can be daunting to others as well as spammers.
While the player is being loaded onto the helicopter at the ending of campaign level "Endgame", Rust can be seen in the background.
This is a good map if the player wants to achieve over 100 kills in a single match, so long as the player is oblivious to their own number of deaths, as the close proximity of the combat allows often results in both quick kills and deaths.
 |
|
- At the bottom of the tower, on the other side of the ladder, is an invisible ladder. This ladder makes for a good camping spot.
- Try to avoid running on the middle pipe that leads to top of the map as it is very easy for enemies to get a kill.
- A fairly good Camping spot is on top of the container on the north side of the map. It is hard to see one in a ghillie suit beside the tower as the only sniping spot in the map. The player can get on by climbing on the barrels then climbing up to the top.
- Placing a Sentry Gun at the top of the tower is useful, as the sentry gun will cover almost the entire map.
- Most forms of air support will easily bombard the map due to its small size and lack of good cover. AnAirstrike can cover about 50% of the map's area, and the Stealth Bomber will cover even more. With Danger Close Pro, the Stealth Bomber can bombard the whole map if placed properly. Due to lack of overhead cover, manually controlled killstreaks such as the Chopper Gunner, are extremely powerful. Users with the AC-130should be careful, as the large explosive radius can kill one's self as well.
- Running up to the top of the tower on the main pipe may seem like the quickest way to get to a vantage point, but it is really one of the quickest ways to get killed.
- While playing 3rd Person, climb to the top of the tower, the player can get a bird's eye view while being fully covered.
- Be aware of the sheltered area underneath the tower, it provides good concealment and relative safety from fire but is vulnerable to grenades.
- Fast moving players will find this map to their advantage, due to the small packed space they can find unsuspecting enemies faster, and dispatch them with a close range Shotgun kill. Also due to the scattered debris they can quickly run to cover should they come under fire.
- Holding one of the covered corners is a sure-fire way to victory. The map is small, so the enemy will have to attack via a very limited number of paths, and sticking together will prevent enemies from spawning too close or in behind.
- If the player goes to the North-Western corner of the map, a small, detached piece of pipe is accessible. This is a good spot to camp from, as it is impervious to all weapons that aren't fired directly into it.
- Rust is a great map for using Akimbo weapons such as the Vector and Mini-Uzi, and shotguns can be very helpful secondary weapons. Close combat situations happen all the time in Rust so the player needs a quick trigger finger to get a good score.
- If calling in a controlled killstreak (such as the Chopper Gunner), it is a good idea to go prone on the top platform before calling it in because most people will not climb up there due to the lack of cover.
- Stay in corners where it is easy to see everyone and have lots of cover. Never be somewhere where an enemy could sneak up from behind if traveling the map, this will happen plenty of times.
- The Deathstreak; Painkiller is very useful on this map, because players often will run around the map and this will reduce the chance of being spawn killed.
- Using Claymores around corners is a sure way to get kills, because many players will pass through looking to camp.
- Another great place to place Claymores is at the top of the map. After climbing the ladder, place a claymore directly facing the ladder, and then go prone as far away as possible away from it, while still being covered. A person climbing the ladder would not notice the Claymore until it is too late, giving the player an easy kill.
- The best way to play this map is with low kill streaks, and a high rate of fire weapons. Then go to one spot, kill one or two people, then move on to another spot.
- A good camping spot is underneath the ladder in the center of the map. There is a good viewpoint and while looking through it the player is virtually invisible and can shoot down the entire length of the southern part of the map (east to west). To get there climb on top of the girder, underneath where the round pipe crosses to the main building, and sprint towards the ladder. At the last second, jump towards the box. If executed correctly, the player will climb up.
- Sniper Rifles are almost useless in this level considering the close-quarter-combat.
- Sitting in the corner by the ramp leading to the top level and facing the opening to the ladder is a great way to get chain spawn kills. Simply sit there with a Tactical Knife on any Pistol and knife as soon as they spawn. However the player is completely open to enemy fire on 2 sides.
- The orange container/lorry is a perfect camping spot because movement can be seen from nearly the whole map.
- Using the deathstreak Martyrdom can be very effective on this map due to its size.
- If the player is good enough to get an AC-130 on this map, it could take out the entire team with one 105mm shot.
- When hiding under the pipe next to the oil rig, it is possible to survive an airstrike or AC-130 attack, which makes it a very good place for cover.
- It is possible to jump from the top of the air vent and onto the top platform, even without Lightweight or Marathon. This is a quicker way up since somebody's always watching the ladder.
- While climbing up the ladder in the center of the map, if the player jumps off just before entering the barred section, one will land on a support, from which that player will have a good view of anyone hiding nearby. If the player walks toward the small platform protruding from the outside, and runs off, climbing onto it in midair, one will have even better cover. Finally, from there, if one jumps at the opening to the east, crouching in midair, the player will fall onto the top of the small opening often camped in on the east side of the tower.
Trivia
- There is a crashed Sea Knight outside the map. This may be a reference to "Endgame", except for the fact that Shepherd crashed in a Pavelow, not a Sea Knight.
- There is a flipped Zodiac near the river. It's a reference to Soap and Price's fight against Shadow Company in Zodiacs, also from "Endgame".
- The Sea Knight outside of the map is also exactly the same one from "Crash" from Call of Duty 4: Modern Warfare.
- If you get a Predator Missile and fire it out of the map and towards the river nearby, a reference to "Endgame," the Predator Missile will go down through the water, then will suddenly explode.
- There is a narrow strip of land near the river that has two WWII era German Opel Blitz trucks, two destroyed Russian ZPU-4 anti-air guns and a Russian T54-55 tank.
- In the tunnel way there is a banging noise.
- This map is not available in the playlist Ground War, as it is extremely small for 18 players. Another reason for this is Domination does not have enough space for 3 flags here.
- It is possible to guide the Predator Missile off a cliff which glitches the game and causes the Predator to automatically explode. The cliff should be to the far right of the electrical plant of the map.
- There is a small village far away from the map - it is possible to get to it by Free Spectating in a private match. In this village, barrels with hazard signs can be found.
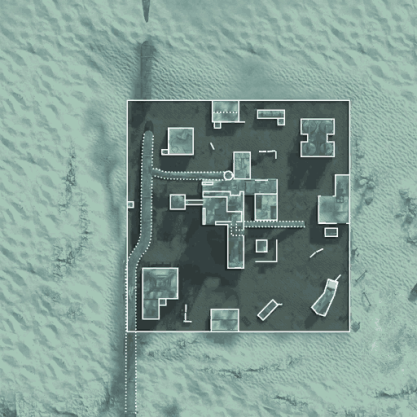
- It was actually possible to hide in one of the pipes, but since the patch, it is no longer possible. The pipe is north of the shack (see map).
- For a view of a Tactical Nuke climb the ladder to the very top and look South East, a sound is heard right before it lands.
- Rust is undoubtedly the least used map in the game. Especially since the arrival of the map packs. It is possible to get this map in the Team Deathmatch playlist, but isn't very often. Free for All, also occasionally uses the map. Team Tactical, and 3rd Person Team Tactical both use it sometimes. And it was in the playlist, 3rd Person Cage Match, before the playlist was removed.
- Rust used to be a popular map to use for a glitch where players would create "public" private matches. Players would randomly get put in 18 man games of FFA and sometimes other modes on Rust. This can't happen anymore though, because Infinity Ward patched the glitch.
- If you drop a care package on the small barrels next to the large tanks, it will remain stuck between the tanks and the barrel. You cannot pickup the care package or see it on the map, suggesting that it gets stuck in the air.